How To: Prepare Your Phone for a Trip Abroad with These Tips
So you're finally ready to head out on that big trip you've been planning for months, huh? It's an exciting time, but there are plenty of things you'll need to prepare before you head out. For instance, it's hard to imagine life without a smartphone these days, and with useful traveling apps like Google Translate and maps, you'll almost have to make sure that you have a working smartphone when you arrive at your destination.But there's a lot more to this than simply packing your phone and a charger. Some carriers offer free overseas roaming, but for those that don't, SIM-unlocking a device and checking supported cellular frequencies will be needed. There are also other steps you should take to ensure that you don't burn through too much data while you're gone, so to make this process a lot easier, I'll go over all of the steps you should take below.
Step 1: See if Your Current Cellular Plan Offers Overseas RoamingSome North American carriers offer free overseas roaming in many countries. If your current cellular provider offers a deal like this, all you'll have to do is simply take your phone with you on your trip—no further setup would be needed in this case.We've compiled a list of all the "freebies" offered by the four major U.S. cellular carriers, which you can view at the link below. Simply read through this list, and if your carrier offers free international roaming, you'll be good to go. Otherwise, you'll have to read on below to see how to temporarily access a different cellular network while you're on your trip.Don't Miss: Save Money with These Awesome Freebies from Your Cellular Provider
Step 2: Find the Frequencies Used by Carriers at Your DestinationIf your existing plan does not offer free overseas roaming, you'll need to find out if your phone supports the frequencies used by carriers at your destination. Most cellular networks operate on the 900 MHz, 2,100 MHz, or 1,800 MHz frequencies, though this can vary by country.To find the frequencies used by a particular carrier, head to these regional lists, then find the country you'll be visiting, and take note of the frequencies used:European carriers and frequencies Asian carriers and frequencies Middle Eastern and African carriers and frequencies North and South American carriers and frequencies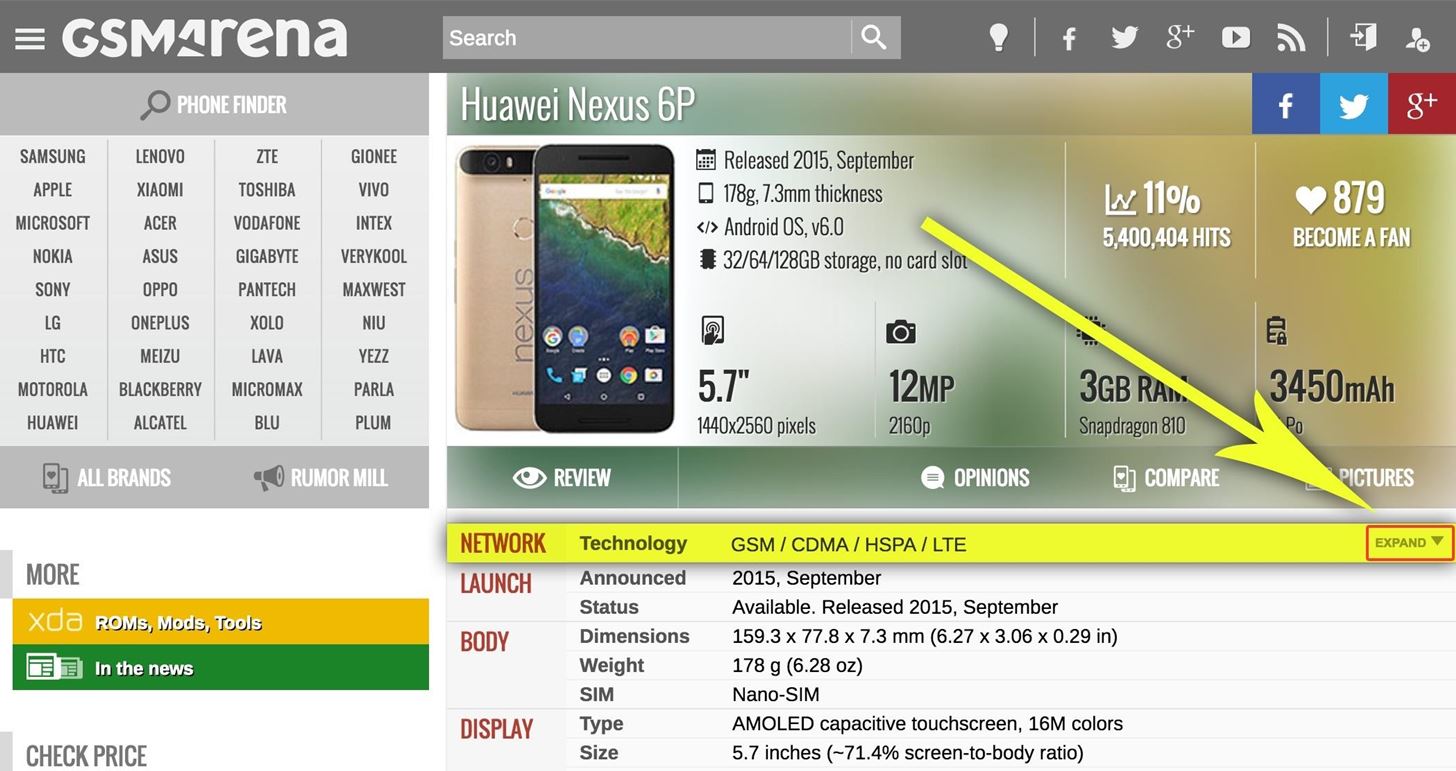
Step 3: See if Your Phone Supports the Right FrequenciesOnce you've found the frequencies used by carriers at your destination, you'll need to make sure your phone is compatible with the overseas cellular network. This can be a little tricky, but I'll guide you through it.The first thing you should be aware of is that Verizon and Sprint use a different type of network than the rest of the world (CDMA instead of GSM). This means that if you purchased your phone from either of these carriers, it is highly unlikely that your device will work in another country, unless that device supports multiple cellular bands. AT&T, T-Mobile, and US Cellular customers don't have to worry about this issue.Secondly, if your device does not have a SIM card slot, it would be more trouble than it's worth to get your phone working on an overseas network. If this is the case, or if you purchased your phone from Sprint or Verizon, I'd recommend that you skip ahead to Step 8 to see other options.Aside from that, you'll just need to see if your device supports the frequencies used by carriers at your destination. To do that, head to GSMArena, then type the name of your phone into the search field at the top of the screen. Once you've arrived at your phone's specs page, click the "Expand" button to the right of the "Network" category near the top of the screen. Once you've done that, read through the full list. The numbers in parenthesis in the "4G bands" category are the main ones to look for, as these are the frequencies your phone uses to connect to its fastest networks. Cross-check these frequency numbers with the numbers you found in Step 2, and if your phone supports the right frequencies, you can proceed to Step 4. Otherwise, if your phone does not support the frequencies used by carriers at your destination, your best bet would be to skip ahead to Step 8 to see other options.
Step 4: SIM-Unlock Your DeviceNow that you know that your phone is capable of functioning on an overseas cellular network, you'll have to contact your current carrier to get them to SIM-unlock your device. This will allow your phone to operate on the overseas network, and it's something that US carriers are now legally required to do in most cases, plus it won't cost you a penny.The process is simple—just call your current carrier, then ask them to SIM-unlock your device. But if you'd like more information on this topic, including eligibility requirements and documentation, please visit our full tutorial below.Don't Miss: How to Unlock Your Smartphone for Free on Any US Carrier
Step 5: Download Important Apps & Data BeforehandAt this point, your phone is almost ready for the big trip. But since you'll be paying for data on an à -la-carte basis while you're away, it would be a good idea to download a few things before you head out.For starters, the most indispensable travel app is definitely Google Translate. It offers a feature that will use your phone's camera to translate signs and menus from other languages in real time, plus it has a "Conversation Mode" that translates between two languages out loud. So before you go, make sure to download the app for either Android or iOS.Install Google Translate for Android from the Google Play Store Install Google Translate for iOS from the iOS App Store Secondly, it would be a good idea to keep a map handy while you travel. Nokia's HERE Maps app lets you download offline maps for entire countries, which ensures that you won't waste any data just by looking at the map. To try it out, download the app, then head to the "Download Maps" section and select the country you'll be traveling to. It's important that you do this while you're still at home so that you don't waste any data while you're overseas.Install HERE Maps for Android from the Google Play Store Install HERE Maps for iOS from the iOS App Store For one last tip, I'd suggest installing and registering with a VoIP app before you head out. If you do this while you're still at home, you'll be able to make international calls to your family at home for free (in most cases) while you're overseas. The app I recommend for this one is called Viber, and aside from installing it, all you'll need to do before you leave is run through initial setup.Install Viber for Android from the Google Play Store Install Viber for iOS from the iOS App Store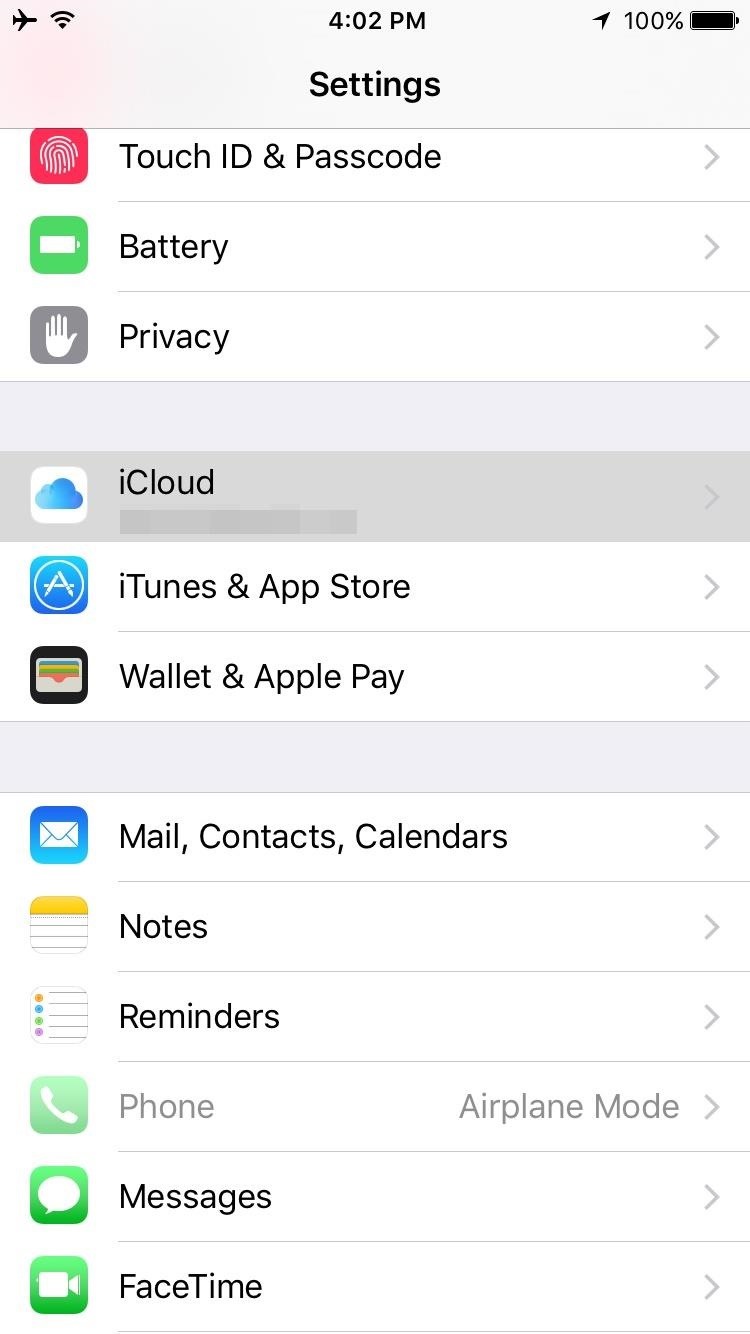
Step 6: Disable Unnecessary SyncingFinally, you should disable unnecessary app syncing before you leave on your trip, as this will prevent your apps from using up data on your overseas prepaid SIM. This process will be a bit different depending on whether you have an Android or iOS device.For iOS devices, start by heading to your phone's main Settings menu, then scroll down a bit and select the iCloud entry. From here, toggle the switches next to any entries that you don't want to be synced, then you'll be all set. Remember this menu for later, because you'll want to come back in and re-enable sync features once you get back home. For Android devices, head to your phone's main Settings menu, then select the Accounts entry. From here, choose the Google option, then select your primary Gmail account. Next, simply use the toggle switches next to each entry to disable them. Remember this menu for later, because you'll want to come back in and re-enable sync features once you get back home.Don't Miss: More Help on Disabling App Syncing on Android Phones
Step 7: Buy a Prepaid SIM at Your DestinationAt this point, you're all set to go. Just remember to bring your SIM card ejection tool when you head out, or grab a paper clip if you've lost the one that came with your device. Once you arrive at your destination, all you'll need to do is purchase a prepaid SIM card from a local cellular carrier.Almost all airports will have kiosks for purchasing a prepaid cellular SIM, so look for the local carrier's logo as you disembark your plane. As far as which plan to choose, I'd suggest that you start with one of the cheaper options, as you can always reload the SIM card later if need be. You shouldn't need to bother with a plan that includes lots of calling minutes or text messages, as the Viber app from Step 5 should cover most of that for you, so look for the best value when it comes to cellular data.Beyond that, simply use your SIM card ejection tool to remove your regular SIM card, and be sure to keep it in a safe place. From there, just insert the new SIM card from the overseas carrier, then reboot your device, and you should be all set to go.
Step 8: Other OptionsIf your current cellular provider does not offer overseas roaming, and your smartphone is not compatible with networks in other countries, your options are a bit limited.First, you can simply purchase a cheap smartphone from a prepaid cellular provider at your destination. This shouldn't be too costly, as most prepaid carriers offer entry-level smartphones starting at around $100, and you can simply use the provided SIM card to connect to the overseas network.For a second option, you might want to consider purchasing a cheap phone before you leave—but you'll have to make sure it can operate on the overseas network. For this one, I'd recommend getting one of Google's Nexus phones, as they're cheap, they're SIM-unlocked, and they're capable of operating on almost any cellular network across the globe. You can buy a Nexus 5 from Amazon for around $150, and it's a great phone that will run all of your favorite apps flawlessly. If you go this route, simply pick back up at Step 7 when you arrive at your destination.Follow Gadget Hacks on Facebook, Twitter, Google+, and YouTube Follow Apple Hacks on Facebook and Twitter Follow Android Hacks on Facebook and Twitter Follow WonderHowTo on Facebook, Twitter, and Google+
Cover image and screenshots by Dallas Thomas/Gadget Hacks
This tip is more about using your phone to prepare for your trip than preparing your phone; nonetheless, it belongs on your to-do list. Prepare a digital backup in case your identification gets lost or stolen. With your camera phone, take a photo of your passport or driver's license, and email the photo to yourself.
How to Pack and Prepare Your Smartphone for Traveling This
Over the years, he has come up with a handy checklist that makes traveling international easier and more efficient. Here are his tips. When it comes to travel, heading abroad is an entirely different animal from your typical family beach vacation.
How to prepare your smartphone for a trip - USATODAY.com
How to Prepare for International Travel. Traveling abroad can be a wonderful experience full of fun, history, and culture. It's important to prepare before you take your trip so that you'll have the best time possible, and avoid mishaps
How To Prepare and Use Your Cell Phone Abroad | SmarterTravel
The last thing you want to come home to after an international trip is an unexpected cell phone bill. But making sure your cell phone will work is often low down on your pre-trip checklist, and it
20 Tips Before Traveling Internationally | Travelzoo
Get Organized: How to Set Up Your Phone for International
Get Organized: How to Set Up Your Phone for International Travel Unless you prepare in advance, using your smartphone abroad can be a nightmare. These tips can help smooth the way.
3 Ways to Prepare for International Travel - wikiHow
Nov 07, 2013 · How to prepare your smartphone for a trip. Here are 10 tips that smartphone-wielding travelers should heed before hitting the road, from adding travel apps to guarding against exorbitant roaming
10 Ways to Prepare Your Cell Phone for a Trip | HuffPost Life
If this is your first time traveling abroad -- or maybe you just need a refresher -- here's a list of 20 tips you should do or bring before your trip. Security & Health. 1. Check-in with your doctor and insurance carrier. Double check and make sure that you have all of the proper vaccinations and that you have renewed all essential prescriptions.
How to Prep Your Phone for International Travel | WIRED
May 09, 2018 · Your smartphone is a helpful travel companion. Before taking it abroad, here's a list of things to pack and do to ensure a problem-free trip.
iPhone International Travel Tips - TripIt Blog
How to Prep Your Phone for International Travel. Using your phone abroad used to be complicated, expensive, or both, but it's getting easier and easier. Gear Up Your Home with These
How to Prepare for International Travel: Tips. Tricks & More
But what about when we travel abroad? How can we make sure we stay connected to our little lifeline? Luckily, your iPhone can be the ultimate travel companion when used correctly. To make sure you're taking full advantage of your perfect travel buddy, we compiled our best tips for using your iPhone abroad. iPhone International Travel Tips Use
0 comments:
Post a Comment