How To: Remove Duplicates & Customize the Open With Menu in Mac OS X
As a regular Mac OS X user, I have a love/hate relationship with the "Open With" contextual menu. Sometimes, it has just what I need. Other times, it's often packed with unnecessary or duplicate items, or missing the app I want to open the file up with the most.Unfortunately, the "Open With" right-click menu does not have its own preferences, so there is no one way to fix all of these issues. But with a little work and determination, you can finally get the "Open With" menu exactly how you want, for every filetype on your Mac.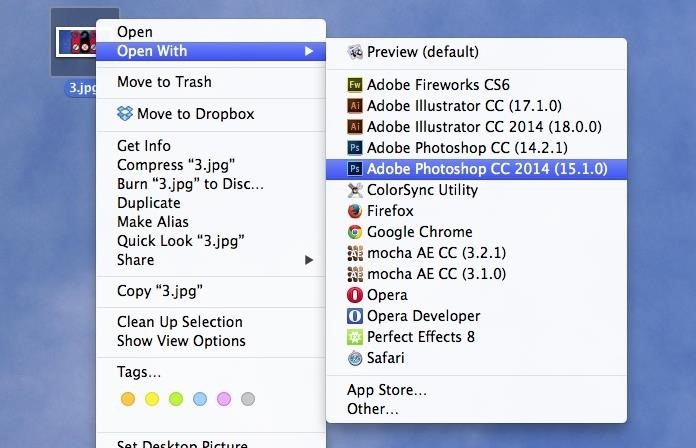
How to Clean Up Duplicate Apps in "Open With"One of the biggest problems with the "Open With" menu is duplicate applications. If you're getting app updates from the Mac App Store, this usually will never happen, but if it's an app you installed from outside the Mac App Store, like Spotify or Photoshop, you'll sometimes see multiple instances of each app in the "Open With" options. In order to get rid of duplicate apps, you'll need to rebuild the Launch Services database, which stores all of the "Open With" options. Below, you can check out three different methods for doing this. Depending on what you're comfortable with, you can either use Terminal commands, trash a .plist file, or use a third-party app.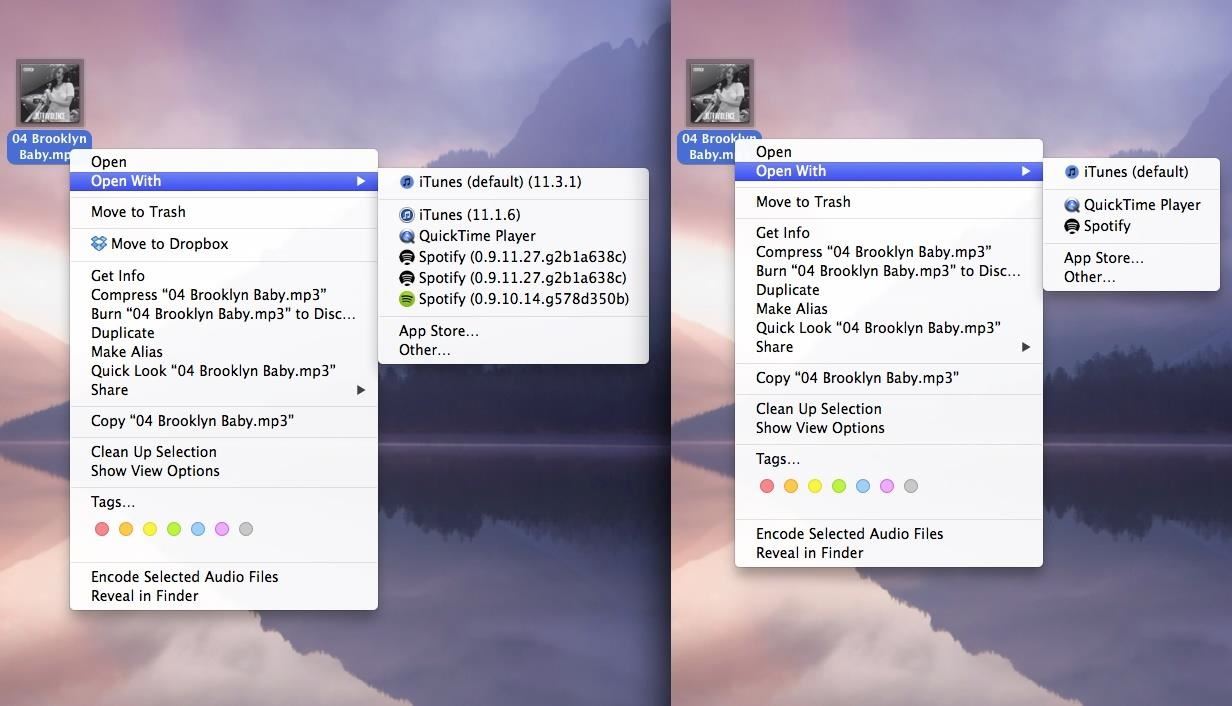
Method #1: Use Terminal to Clear DuplicatesOn my Mac, I currently have duplicate Spotify versions showing up whenever I try to open up an MP3 file. Below, you can see the before (with 3 versions of Spotify) and after (with only the latest Spotify version). Open up Terminal and enter the following two commands, each followed by the Enter key. These commands will rebuild the LaunchServices file and will refresh the Finder so that the changes take effect. You might have to wait a minute or two for the first command before killing the Finder, as the database needs time to restructure itself./System/Library/Frameworks/CoreServices.framework/Frameworks/LaunchServices.framework/Support/lsregister -kill -r -domain local -domain system -domain userkillall Finder All of the duplicates that previously appeared in "Open With" should now be gone. If you're not comfortable using Terminal, try out the next method.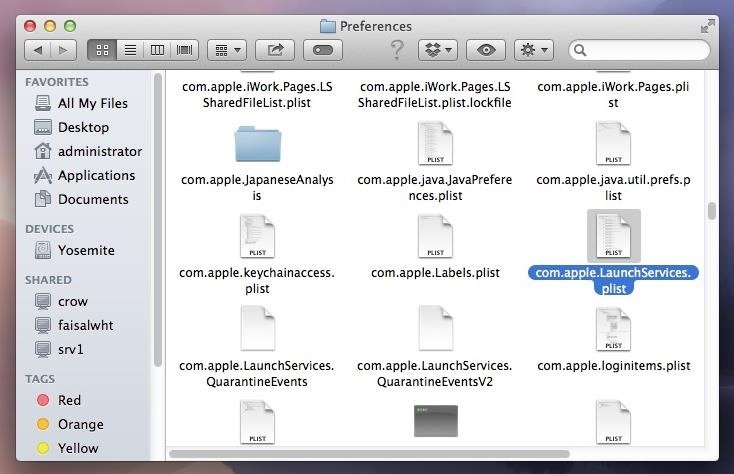
Method #2: Manually Delete the LaunchServices FileOne of the easiest ways to clear duplicate apps is by manually deleting the LaunchServices preference file. Doing so will cause Mac OS X to rebuilt it, choosing only the latest versions of each app.With Finder open, hold down on the Option key on your keyboard while clicking on Go in the menu bar. Select Library. Open the Preferences folder. Find the com.apple.LaunchServices.plist file and trash it. Afterward, make sure to close all applications before clearing your Trash, so that the .plist file can properly deleted. If it doesn't work right away, restart your computer for all of the changes to take effect.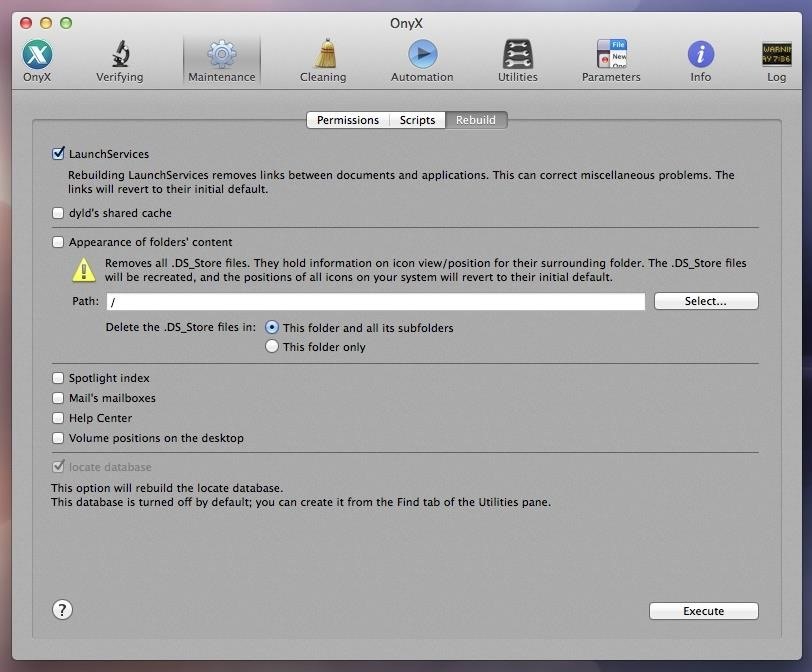
Method #3: Use OnyX to Do It for YouLastly, you can also use a third-party app in order to rebuild your LaunchServices .plist file.Download and install OnyX by Titanium Software. Make sure to choose the right version for your version of Mac OS X. Enter your admin username and password to install. You may need to go into the Security & Privacy settings in your System Preferences to allow the installation from outside of the Mac App Store. Open up OnyX and go to Maintenance -> Rebuild. Check the box next to LaunchServices. Click Execute. OnyX will then close all of your applications and rebuild your LaunchServices .plist file for you.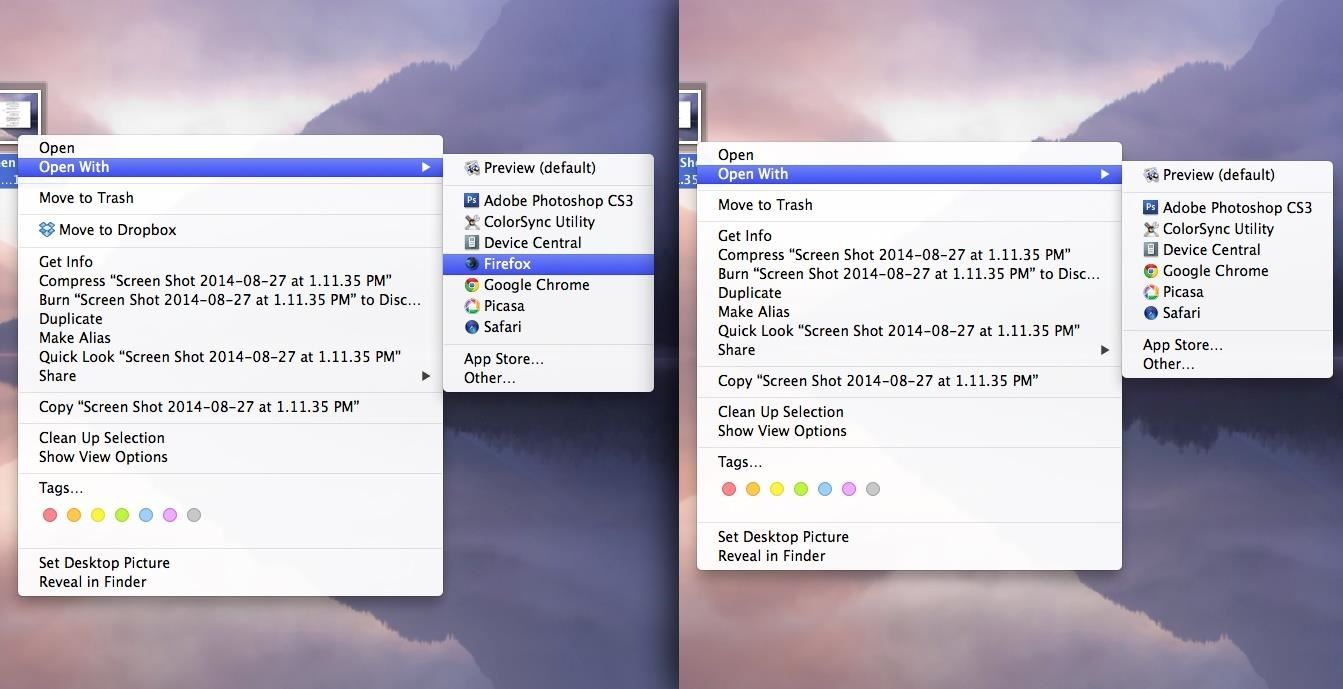
How to Delete a Specific App from "Open With"While clearing the LaunchServices .plist will clear any duplicates, it won't get rid of an unwanted app that appears under the "Open With" menu. For this section of the guide, I will be deleting Firefox as an option for opening screenshots, which have a .png extension. To ban a specific application from appearing under "Open With" for a certain file, do the following.Go to the app you want to ban and right-click on it. Click on Show Package Contents. Open the Contents folder. Open Info.plist with any text editor, like TextEdit. Look for CFBundleTypeExtensions, which should show up several times. Under that, you should see a few lines that have <string>file name</string>. Once you find the suffix you want to take off (in my case. it's the <string>png</string> line), delete it from the text editor and save the file. Lastly, open Terminal and enter the killall Finder command. Now when you select the "Open With" option, the app will be gone.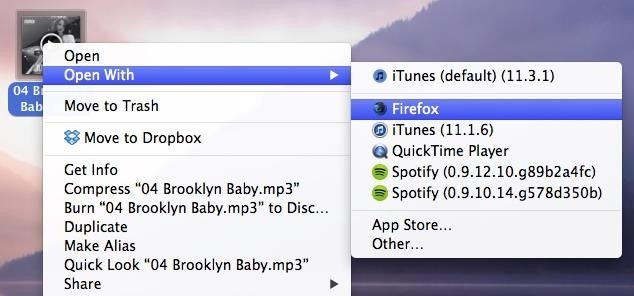
How to Add an App to "Open With"Now that I've shown you how to get rid of an app, I'm going to show you how to add an app to the list for a certain file. I will be adding Firefox to the list of options that show up for .mp3 files. Similar to the process above, you'll need to right-click on the app, select Show Package Contents, open the Contents folder, and open the Info.plist with a text editor. Then, between any two </dict> and <dict>, add the following:<dict><key>CFBundleTypeExtensions</key><array><string>url</string></array></dict> Save the file, then go to Terminal and enter the following two commands to save the changes./System/Library/Frameworks/CoreServices.framework/Versions/A/Frameworks/LaunchServices.framework/Versions/A/Support/lsregister -f /Applications/TextEdit.app/killall FinderNow when you open a certain file (.mp3), you'll see the application that you've added (Firefox) as an "Open With" option.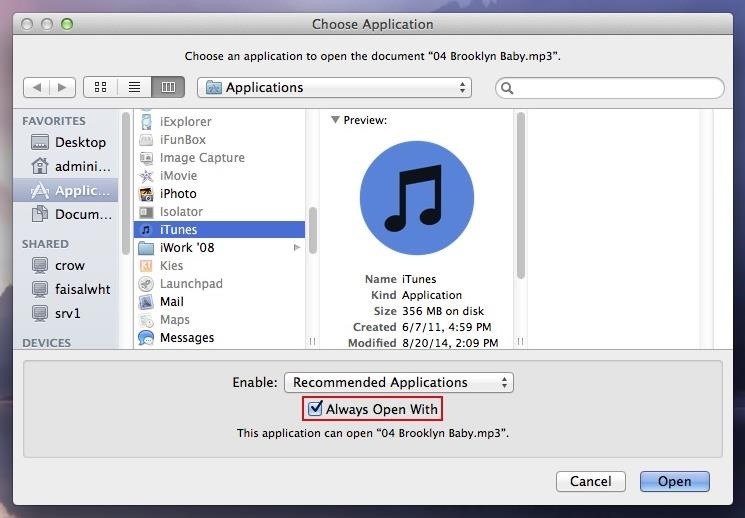
How to Set an App as the Default Option in "Open With"Lastly, I'm going to show you how to set an app as the default "Open With" option for whenever you just want to double-click on a file and open it up directly.Right-click on the file. Select Open With. Click on Other.... In the window, find the app you want to open the file with and check the box next to Always Open With at the bottom. Select Open. Alternatively, you can do this by right-clicking on the file and choosing Get Info (keyboard shortcut Command + I). Then just select the app you want as the default under the Open with: section, and click on Change All... to complete the action. Now every time you open a file with a certain extension using a double-click, it will open with the default app.If you guys have any other problems with the "Open With" contextual menu, let us know and we'll see what we can do.
Home Entertainment Get a free Amazon or Roku streaming stick when you try Sling TV. Granted, you have to try it for a full three months, but the math is still way in your favor.
Sling TV offers free Amazon Fire TV stick, Roku Streaming
This Setting Makes It Easier to Locate Your iPhone When It's
For many, phones are starting to replace televisions as the primary device for watching videos. Thanks to their portability and easy to use apps, it's often simpler to watch Netflix, Hulu, YouTube, or Prime Instant Video on the smaller screen.
Netflix vs. Hulu Plus vs. Amazon Prime: Which streaming
Step 4: Add a Pit Stop Using Google Assistant You can use Google Assistant to add a pit stop to your current route, but keep in mind that this method isn't completely hands-free. To do so, summon you assistant as you did when initiating navigation, but this time, say "add a gas station to current route" or something similar.
Use Google Assistant while navigating - Android - Google Maps
Even when activity is deleted, some data about your use of Google services may be kept for the life of your Google Account. For example, after you delete a search from My Activity, your account will store the fact that you searched for something, but not what you searched for.
How to Delete Your Google Search History in a Few Easy Steps
money.com/money/5221313/how-to-delete-your-google-search-history/
Deleting your Google web browser history and Google search history is one way to limit how much data you allow to be collected about you on the internet. Even if you're someone who already uses Google's incognito web browser, you're still not being kept completely anonymous online.
How to Delete Google History: 8 Steps (with Pictures
If your iPhone is acting up, frozen on a screen, and/or won't respond to you, force-restarting it is a surefire way to whip it back into shape. And the process is easy on older devices just hold down a two-button combo until the Apple logo appears. That's no longer the case with the iPhone 8 and
How to Lock Your iPhone in Landscape Mode
Galaxy Oreo Update: Samsung Adds Screenshot Labeling Feature in Android 8.0 How To: Turn Your Samsung Galaxy S3, Note 2, and Other Android Devices into Wi-Fi Computer Mice The Padfone X: The 5-Inch Phone That Doubles as a Tablet
How to Take a Screenshot on Your Samsung Galaxy Gear
Hack the News: Build Your Own Media-Altering Newstweek Device How To: You Can't Stop Gmail from Scanning Your Emails—But You Can Limit Their Ad Targeting How To: Really Connect Your Instagram Account to Facebook on Your iPhone How To: Develop Kodachrome Film (B&W Hand Processing & Kodak's K-14 Process)
> Remove or switch the SIM card in your iPhone or iPad Learn how to remove or transfer the SIM card in your iPhone or iPad (Wi-Fi+ Cellular models). After you remove or transfer your SIM card , insert the tray completely and in the same orientation that you removed it (it will fit only one way).
How to Switch SIM Cards on an iPhone | It Still Works
How Google's Titan M chip makes the Pixel 3 its most secure
Hey Guys X060ENDOCREEPER here today showing you how to download free music and videos using mozilla firefox on youtube !!! its really fast and easy !! Update
How To Download any Video from Internet using Mozilla Firefox
This wikiHow teaches you how to send an email from your computer as a text message to a phone number. You can do this by entering your recipient's phone number and their carrier's email code in the "To" text field of your email service and then typing in a message.
How to Send Emails From Your Computer to Mobile Phones
How To: Get the Galaxy S5's New S Voice App on Your Samsung Galaxy S4 How To: Turn Your Samsung Galaxy S4 into a Wireless Shutter Release Remote for Your DSLR Camera How To: Share Your Samsung Galaxy S3's Screen with Other Devices
Bluetooth Wireless Remote Control Camera Shutter Release Self
L'HTC ThunderBolt costa $ 249 con un piano biennale su Verizon Wireless. Il prezzo pieno al dettaglio è $ 599,99. Rimozione di Bloatware (root) Se vuoi perfezionare il tuo smartphone ed eliminare tutti quei bloatwares non cancellabili, l'unica opzione è quella di eseguire il root del tuo dispositivo.
How-To: Safely Root HTC Thunderbolt | One Click Root
0 comments:
Post a Comment